armory-library
Getting Started
This tutorial will walk you through the pieces needed to build and execute an Armory evaluation. In the process, we’ll look at the basic concepts of adversarial evaluation and how Armory provides components needed to effect them.
The basic dataflow of Armory-library is shown in the diagram below.
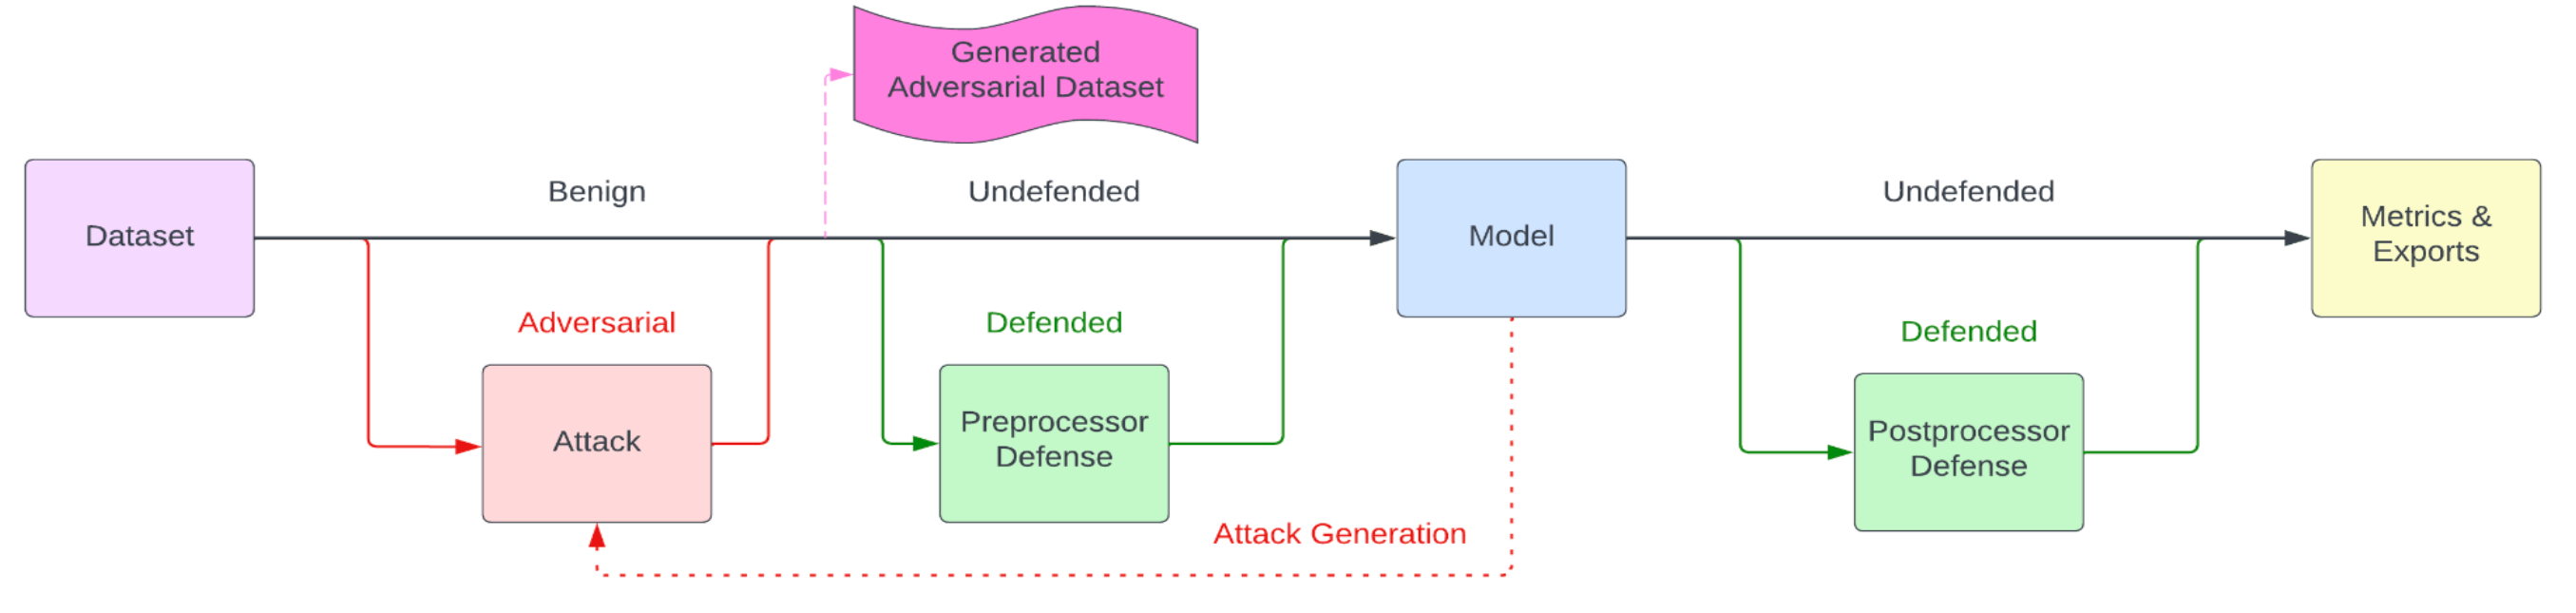
The Model and Dataset are the inputs under evaluation, and the Attack is an
adversarial perturbation applied to the Dataset. Typically, the Model and Dataset
will be provided by the armory-library user and the Attack will be drawn from
armory-library or the IBM Adversarial Robustness Toolbox (ART). In this tutorial
we will not deal with the green defense boxes or the pink generated adversarial dataset.
Dataset
Armory currently supports image classification and object detection models. We look at an image classification example here, with object detection described in Diving Deeper.
The structure of an image classification dataset is simple, consisting of pairs of images and labels. Images are 2-dimensional arrays of pixels, often supplied as PNG or JPEG images. Labels are integers that correspond to the class label of the image. For example, in the standard MNIST dataset, the images are 28×28 grayscale handwritten digits, and the labels are integers from 0 to 9. The label represents the “ground truth” for the image, or what the model should predict when shown the image. Again using MNIST digits, the label associated with a handwritten digit 8 will be 8; we expect the model to predict the label 8 when receiving the image.

A dataset is a collection of images (samples) in a sequence-like structure such as a tuple, map, or NumPy array. Each can have a target label assigned. Datasets can be imported from a variety of sources such as PyTorch, Hugging Face or GitHub.
Basic
The following is a basic example of loading tuple data:
from pprint import pprint

raw_dataset = [
        ([1, 2, 3], 4),
        ([5, 6, 7], 8),
    ]

keyed_dataset = TupleDataset(raw_dataset, x_key="data", y_key="target")
pprint(keyed_dataset)
You’ll see that we have turned the raw dataset into a map with keys data and
target. These keys are arbitrary, but the same keys correponding to the image
and labels, respectively, must be provided in the evaluation.
For the raw dataset we need an adapter to apply the keys to the data tuples –
note that this adapter is included by default in the TupleDataset constructor.
def adapter(data):
    return dict(zip(["data", "target"], data))
dataset = ArmoryDataset(keyed_dataset, adapter)
Hugging Face
The following is an example of how to load a dataset from Hugging Face.
import datasets # Hugging Face dataset library
from transformers import AutoImageProcessor # Hugging Face image processor class
from armory.data import ArmoryLoader


dataset = datasets.load_dataset("mnist", split="test")
processor = AutoImageProcessor.from_pretrained(
        "farleyknight-org-username/vit-base-mnist"  # Hugging Face model card
    )

dataset.set_transform(functools.partial(transform, processor))
dataloader = ArmoryDataLoader(dataset, batch_size=batch_size, num_workers=5)
The load_dataset function imports the MNIST (handwritten digit)
dataset from Hugging Face. It is the same dataset that was used to train the
model in this example. The split parameter specifies which subset of the
dataset to load and is usually either train, test or possibly validation,
depending on the dataset.
The function transform loops through the images in a sample and converts
each image into Hugging Face’s ‘RGB’ form. The set_transform method ensures that
the transform function will be applied to the entire Hugging Face dataset on load.
AutoImageProcessor.from_pretrained expects a Hugging Face model name.
Then the PyTorch ArmoryDataLoader generates the NumPy arrays that are
required by, for example, an ART attack in the evaluation.
Model
A model is the output of a machine learning algorithm run on a training set of data. It is used to identify patterns or make predictions on unseen datasets. Models can be imported from a variety of sources, including TorchVision, Hugging Face, GitHub and PyPI.
TorchVision
The following is an example of how to import a model from TorchVision.
from torchvision.models import resnet18, ResNet18_Weights
weights = ResNet18_Weights.DEFAULT
tv_model = resnet18(weights=weights, progress=False)
armory_model = armory.model.image_classification.ImageClassifier(
    name="ViT-finetuned-food101",
    model=tv_model,
    inputs_spec=armory.data.TorchImageSpec(
        dim=armory.data.ImageDimensions.CHW, scale=normalized_scale
    ),
)
Here, we use armory.model.image_classification.ImageClassifier to make the
model compatible with Armory.
Hugging Face
The following is an example of how to import a model from Hugging Face.
model_name = "farleyknight-org-username/vit-base-mnist"
hf_model = armory.track.track_params(
    transformers.AutoModelForObjectDetection.from_pretrained
)(pretrained_model_name_or_path=model_name)
armory_model = armory.model.image_classification.ImageClassifier(
    name="ViT-finetuned-food101",
    model=hf_model,
    inputs_spec=armory.data.TorchImageSpec(
        dim=armory.data.ImageDimensions.CHW, scale=normalized_scale
    ),
)
Here, farleyknight-org-username/vit-base-mnist is the Hugging Face model card
name. track_params is a function wrapper that stores the argument values as
parameters in MLflow. Like with TorchVision, we use armory.model.image_classification.ImageClassifier
to make the model compatible with Armory.
GitHub
The following is an example of how to import a model from GitHub, after having cloned the relevant repository:
git clone 'https://github.com/Lornatang/SRGAN-PyTorch'
import sys
sys.path.insert(0,'/SRGAN-PyTorch')
from SRGAN-PyTorch import model as pytorch_new_model

SRRmodel = pytorch_new_model.SRResNet()

armory_model = armory.model.image_classification.ImageClassifier(
    name="ViT-finetuned-food101",
    model=SRRmodel,
    inputs_spec=armory.data.TorchImageSpec(
        dim=armory.data.ImageDimensions.CHW, scale=normalized_scale
    ),
)
Here, we add the GitHub folder to the system path and import the mode. Then, as
in the last example, we use the armory.model.image_classification.ImageClassifier to make the
model compatible with Armory.
PyPI
The following is an example of loading a model from the EfficientNet Lite PyTorch library:
from efficientnet_lite_pytorch import EfficientNet

from efficientnet_lite0_pytorch_model import EfficientnetLite0ModelFile
weights_path = EfficientnetLite0ModelFile.get_model_file_path()

lite0_model = EfficientNet.from_pretrained('efficientnet-lite0', weights_path = weights_path )

armory_model = armory.model.image_classification.ImageClassifier(
    name="ViT-finetuned-food101",
    model=lite0_model,
    inputs_spec=armory.data.TorchImageSpec(
        dim=armory.data.ImageDimensions.CHW, scale=normalized_scale
    ),
)
Here, we import the library and create a model from the case with a weights path added.
In each case, we use the PyTorchClassifier wrapper to make the model
compatible with the ART library. Note that this is specific to image
classification models written within the PyTorch framework. The parameters can
be adjusted as needed. track_initial_params is used so that these parameters
are also tracked in MLflow.
classifier = track_init_params(PyTorchClassifier)(
    model=armory_model,
    loss=torch.nn.CrossEntropyLoss(),
    optimizer=torch.optim.Adam(model.parameters(), lr=0.003),
    input_shape=(3, 224, 224),
    channels_first=True,
    nb_classes=10,
    clip_values=(-1, 1),
)
Attack
An attack is a transformation of (each sample in) the dataset in order to disrupt the machine learning algorithm’s results. For example, after an attack, the model may misclassify an image or fail to detect an object. In Armory, targeted attacks are designed to focus on only one class at a time. This is how we test the adversarial robustness of a machine learning model.
Attacks can be loaded from IBM’s Adversarial Robustness Toolbox.
The following is an example of how to define an attack from ART’s ProjectedGradientDescent class. The Projected Gradient Descent attack is an iterative method in which, after each iteration, the perturbation is projected on an lp-ball of specified radius (in addition to clipping the values of the adversarial sample so that it lies in the permitted data range). This is the attack proposed by Madry et al. for adversarial training.
attack = Attack(
        name="PGD",
        attack=track_init_params(art.attacks.evasion.ProjectedGradientDescent)(
            classifier,
            batch_size=1,
            eps=epsilon,
            eps_step=0.007,
            max_iter=20,
            num_random_init=1,
            random_eps=False,
            targeted=False,
            verbose=False,
        ),
        use_label_for_untargeted=True,
    )
Again, track_init_params is used to output the initial metrics to MLflow. It
takes as input the default specs for this attack.